
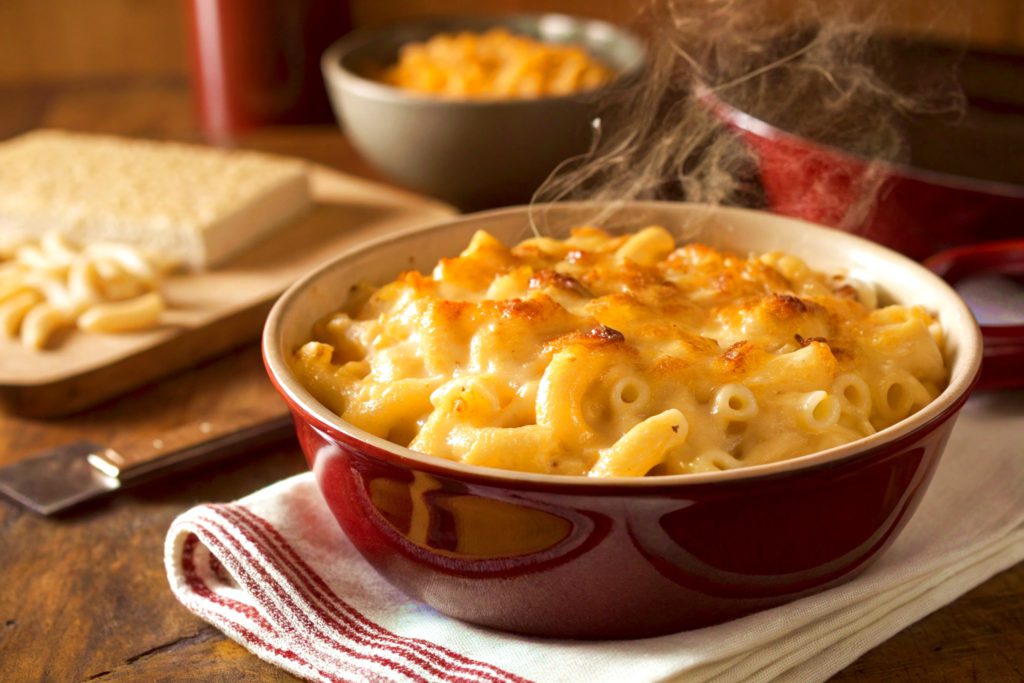
There’s nothing quite like a bowl of rich, creamy macaroni and cheese to warm your soul and satisfy your comfort food cravings. This homemade mac and cheese recipe delivers that classic, nostalgic flavor you love while using wholesome, real-food ingredients you can feel good about serving your family.
Whether you’re looking for a quick stovetop version for busy weeknights or a decadent baked mac and cheese with a golden, crunchy topping for special gatherings, this recipe has you covered. Made with real cheese, whole grain pasta options, and a silky-smooth cheese sauce, this dish proves that comfort food can be both delicious and made with quality ingredients.
Why You’ll Love This Mac and Cheese Recipe
This isn’t your average boxed macaroni and cheese. Here’s what makes this homemade version special:
Real, Whole-Food Ingredients: No artificial colors, flavors, or preservatives—just real cheese, milk, butter, and pasta. You know exactly what’s going into your family’s meal.
Two Cooking Methods: Choose the quick stovetop method for weeknight convenience, or go for the baked casserole version when you want that irresistible crispy top layer.
Customizable: This recipe serves as a perfect base for adding vegetables, different cheese combinations, or protein to boost nutrition and variety.
Kid-Approved: Even picky eaters love this creamy, cheesy dish, making it an excellent way to introduce whole grain pasta into their diet.
Make-Ahead Friendly: The baked version is perfect for meal prep, potlucks, and holiday gatherings.
Ingredients You’ll Need
For the Macaroni and Cheese:
- 1 pound elbow macaroni (whole wheat or chickpea pasta for added nutrition)
- 4 tablespoons unsalted butter (grass-fed preferred)
- 1/4 cup all-purpose flour (or whole wheat flour)
- 3 cups whole milk (or 2% milk)
- 1 cup heavy cream (or additional milk for lighter version)
- 4 cups sharp cheddar cheese, shredded (about 16 ounces)
- 1 cup Gruyère or mozzarella cheese, shredded (optional, for depth)
- 1 teaspoon Dijon mustard
- 1/2 teaspoon garlic powder
- 1/2 teaspoon onion powder
- 1/4 teaspoon paprika
- 1/2 teaspoon sea salt (adjust to taste)
- 1/4 teaspoon black pepper
- Pinch of nutmeg (optional, enhances cheese flavor)
For the Baked Version Topping:
- 1 cup whole wheat panko breadcrumbs
- 2 tablespoons melted butter
- 1/4 cup grated Parmesan cheese
- 1/2 teaspoon dried parsley
Ingredient Notes and Substitutions
Pasta Choice: While traditional elbow macaroni is classic, consider using whole wheat pasta for added fiber and nutrients. Chickpea or lentil pasta adds protein and makes this dish suitable for those seeking gluten-free options. Cavatappi, shells, or penne also work beautifully.
Cheese Selection: Sharp cheddar provides the signature mac and cheese flavor, but mixing in Gruyère adds a sophisticated, nutty depth. For extra creaminess, include some mozzarella or Monterey Jack. Always shred cheese from a block rather than using pre-shredded varieties, which contain anti-caking agents that prevent smooth melting.
Milk and Cream: Whole milk creates the creamiest sauce, but 2% milk works well too. The heavy cream adds richness, but you can substitute with additional milk or even Greek yogurt for a protein boost (add after removing from heat).
Butter: Grass-fed butter contains more omega-3 fatty acids and vitamins A and K2 compared to conventional butter.
Flour Alternative: For a gluten-free roux, use rice flour or a gluten-free all-purpose blend. The texture will be equally smooth.
Step-by-Step Instructions
For Stovetop Mac and Cheese:
Step 1: Cook the Pasta
Bring a large pot of salted water to a boil. Add the macaroni and cook according to package directions until al dente (usually 7-8 minutes). Drain and set aside. Tip: Slightly undercook the pasta by 1 minute if you plan to bake it, as it will continue cooking in the oven.
Step 2: Make the Cheese Sauce (Roux)
In the same pot (no need to wash it!), melt the butter over medium heat. Once melted and foaming, whisk in the flour. Cook for 1-2 minutes, whisking constantly, until the mixture turns golden and smells slightly nutty. This removes the raw flour taste.
Step 3: Add the Dairy
Gradually pour in the milk and cream while whisking continuously to prevent lumps. Continue whisking until the mixture thickens and coats the back of a spoon, about 5-7 minutes. The sauce should be smooth and creamy.
Step 4: Melt the Cheese
Reduce heat to low. Add the shredded cheddar and Gruyère (if using) one handful at a time, stirring until completely melted before adding more. Stir in the Dijon mustard, garlic powder, onion powder, paprika, salt, pepper, and nutmeg.
Step 5: Combine and Serve
Add the cooked pasta to the cheese sauce and stir until every piece is coated. Taste and adjust seasonings if needed. Serve immediately while hot and creamy.
For Baked Mac and Cheese:
Step 1: Prepare the Base
Follow steps 1-5 above to create your stovetop mac and cheese.
Step 2: Transfer to Baking Dish
Preheat your oven to 350°F (175°C). Lightly grease a 9×13-inch baking dish with butter or oil. Pour the prepared mac and cheese into the dish, spreading it evenly.
Step 3: Make the Crunchy Topping
In a small bowl, combine the panko breadcrumbs, melted butter, Parmesan cheese, and dried parsley. Mix until the breadcrumbs are evenly coated.
Step 4: Add Topping and Bake
Sprinkle the breadcrumb mixture evenly over the mac and cheese. Bake for 25-30 minutes, until the top is golden brown and crispy, and the edges are bubbling. For an extra-crispy top, broil for the last 2-3 minutes, watching carefully to prevent burning.
Step 5: Rest and Serve
Let the baked mac and cheese rest for 5 minutes before serving. This allows the sauce to thicken slightly and makes serving easier.
Serving Suggestions
This creamy macaroni and cheese works wonderfully as both a comforting main dish and a crowd-pleasing side. Pair it with a crisp green salad dressed with lemon vinaigrette to balance the richness. Roasted vegetables like broccoli, Brussels sprouts, or green beans add color, texture, and nutrients to your plate.
For a complete meal, serve alongside grilled chicken, baked turkey meatballs, or herb-roasted salmon. The mac and cheese also complements barbecue dishes beautifully—think grilled chicken, pulled turkey, or veggie burgers.
Add a nutritional boost by stirring in steamed broccoli florets, roasted butternut squash cubes, or sautéed spinach directly into the mac and cheese before baking. This creates a more balanced, veggie-packed meal that kids often enjoy because the cheese sauce makes vegetables more appealing.
Recipe Variations and Add-Ins
Buffalo Chicken Mac and Cheese: Stir in diced rotisserie chicken and buffalo sauce, then top with crumbled blue cheese before baking.
Garden Vegetable Mac: Add steamed broccoli, peas, carrots, and cauliflower for a colorful, nutrient-dense twist.
Three-Cheese Blend: Experiment with different cheese combinations like white cheddar, fontina, and aged Gouda for complex flavors.
Herb-Infused: Fresh thyme, rosemary, or chives stirred into the cheese sauce add aromatic depth.
Spicy Kick: Add cayenne pepper, jalapeños, or a dash of hot sauce for those who enjoy heat.
Truffle Mac and Cheese: Drizzle with truffle oil before serving for an elegant, earthy flavor.
Storage and Reheating Tips
Refrigerator: Store leftover mac and cheese in an airtight container for up to 4 days. The sauce may thicken when cold, which is normal.
Freezing: This recipe freezes well for up to 3 months. For best results, freeze the unbaked version (before adding the breadcrumb topping). Wrap the baking dish tightly with plastic wrap and aluminum foil, or portion into individual freezer-safe containers. Thaw overnight in the refrigerator before baking.
Reheating: For stovetop mac and cheese, reheat gently on the stove over low heat, adding a splash of milk to restore creaminess. For baked mac and cheese, cover with foil and reheat at 350°F for 20-25 minutes until warmed through. Remove foil for the last 5 minutes to re-crisp the topping. Individual portions can be microwaved, though the texture won’t be quite as good.
Nutrition Insights
While macaroni and cheese is undeniably a comfort food, this homemade version offers nutritional advantages over boxed varieties:
Real Cheese Benefits: Natural cheese provides high-quality protein, calcium for bone health, vitamin B12, phosphorus, and zinc. Sharp cheddar is particularly rich in vitamin K2, which supports bone and heart health.
Whole Grain Option: Using whole wheat pasta increases fiber content, which aids digestion, helps maintain stable blood sugar levels, and promotes feelings of fullness.
Protein Boost: Each serving provides substantial protein from both the cheese and milk. For even more protein, use chickpea or lentil pasta, which can offer 15+ grams of protein per serving.
Portion Awareness: While nutrient-dense, mac and cheese is calorie-rich. Serving it alongside vegetables and lean protein creates a more balanced meal. Consider this dish a special treat or weekend comfort food rather than an everyday staple.
Calcium Content: This recipe is an excellent source of calcium, with one serving providing a significant portion of your daily needs—essential for bone health, muscle function, and nerve transmission.
Frequently Asked Questions
Can I make this dairy-free?
Yes! Use dairy-free butter, plant-based milk (oat or cashew work best for creaminess), and dairy-free cheese alternatives. Nutritional yeast adds a cheesy flavor boost.
Why is my cheese sauce grainy?
This usually happens when cheese is added to sauce that’s too hot or when heat is too high. Always reduce heat to low before adding cheese, and add it gradually while stirring constantly.
Can I use pre-shredded cheese?
While convenient, pre-shredded cheese contains anti-caking agents that prevent smooth melting. For the creamiest sauce, shred cheese from a block yourself.
How do I make it ahead?
Prepare the mac and cheese completely, cover tightly, and refrigerate for up to 24 hours before baking. Add 5-10 minutes to the baking time if going straight from fridge to oven.
Final Tips for Perfect Mac and Cheese
- Don’t overcook the pasta: Al dente pasta holds up better in cheese sauce and won’t become mushy.
- Use room temperature cheese: This helps it melt more smoothly into the sauce.
- Taste and adjust: Every cheese brand has different salt levels, so always taste before serving and adjust seasonings.
- Let baked mac and cheese rest: Those few minutes make it easier to serve and allow flavors to settle.
- Save pasta water: A splash of starchy pasta water can help thin sauce if it becomes too thick.
This homemade macaroni and cheese recipe brings together everything you love about comfort food while using real, wholesome ingredients. Whether you choose the quick stovetop method or the show-stopping baked version, you’ll have a creamy, satisfying dish that brings smiles to the table every time!
Creamy Homemade Macaroni and Cheese (Stovetop or Baked!)
A rich, creamy, and easy-to-make macaroni and cheese recipe, with instructions for both a quick stovetop version and a decadent baked casserole with a crunchy topping.
Ingredients
- 1 pound elbow macaroni (whole wheat or chickpea pasta for added nutrition)
- 4 tablespoons unsalted butter (grass-fed preferred)
- 1/4 cup all-purpose flour (or whole wheat flour)
- 3 cups whole milk (or 2% milk)
- 1 cup heavy cream (or additional milk for lighter version)
- 4 cups sharp cheddar cheese, shredded (about 16 ounces)
- 1 cup Gruyère or mozzarella cheese, shredded (optional, for depth)
- 1 teaspoon Dijon mustard
- 1/2 teaspoon garlic powder
- 1/2 teaspoon onion powder
- 1/4 teaspoon paprika
- 1/2 teaspoon sea salt (adjust to taste)
- 1/4 teaspoon black pepper
- Pinch of nutmeg (optional, enhances cheese flavor)
- 1 cup whole wheat panko breadcrumbs (for topping)
- 2 tablespoons melted butter (for topping)
- 1/4 cup grated Parmesan cheese (for topping)
- 1/2 teaspoon dried parsley (for topping)
Instructions
- Bring a large pot of salted water to a boil. Add the macaroni and cook according to package directions until al dente (usually 7-8 minutes). Drain and set aside. (Slightly undercook by 1 minute if baking later)
- In the same pot, melt the butter over medium heat. Once melted and foaming, whisk in the flour. Cook for 1-2 minutes, whisking constantly, until the mixture turns golden and smells slightly nutty.
- Gradually pour in the milk and cream while whisking continuously to prevent lumps. Continue whisking until the mixture thickens and coats the back of a spoon, about 5-7 minutes.
- Reduce heat to low. Add the shredded cheddar and Gruyère (if using) one handful at a time, stirring until completely melted before adding more. Stir in the Dijon mustard, garlic powder, onion powder, paprika, salt, pepper, and nutmeg.
- Add the cooked pasta to the cheese sauce and stir until every piece is coated. Taste and adjust seasonings if needed.
- **For Stovetop Mac and Cheese**: Serve immediately while hot and creamy.
- **For Baked Mac and Cheese**: Preheat your oven to 350°F (175°C). Lightly grease a 9x13-inch baking dish. Pour the prepared mac and cheese into the dish, spreading it evenly.
- In a small bowl, combine the panko breadcrumbs, melted butter, Parmesan cheese, and dried parsley. Mix until the breadcrumbs are evenly coated.
- Sprinkle the breadcrumb mixture evenly over the mac and cheese. Bake for 25-30 minutes, until the top is golden brown and crispy, and the edges are bubbling. For an extra-crispy top, broil for the last 2-3 minutes, watching carefully.
- Let the baked mac and cheese rest for 5 minutes before serving.
Equipment
- Large pot
- Whisk
- 9x13-inch baking dish (for baked version)
- Small bowl
- Oven
Notes
- Slightly undercook pasta by 1 minute if you plan to bake it, as it will continue cooking in the oven.
- Always shred cheese from a block rather than using pre-shredded varieties for the creamiest sauce.
- For a gluten-free roux, use rice flour or a gluten-free all-purpose blend.
- Store leftover mac and cheese in an airtight container for up to 4 days.
- Freeze the unbaked version for up to 3 months; thaw overnight in the refrigerator before baking.
- Reheat stovetop mac and cheese gently on the stove over low heat, adding a splash of milk to restore creaminess.
- To reheat baked mac and cheese, cover with foil and bake at 350°F for 20-25 minutes, then remove foil for the last 5 minutes to re-crisp.
- Don't overcook the pasta; al dente pasta holds up better in cheese sauce and won't become mushy.
- Use room temperature cheese to help it melt more smoothly into the sauce.
- Taste and adjust seasonings as every cheese brand has different salt levels.
- Let baked mac and cheese rest for 5 minutes before serving to thicken slightly and make serving easier.
- A splash of starchy pasta water can help thin the sauce if it becomes too thick.
- For a dairy-free version, use dairy-free butter, plant-based milk (oat or cashew), dairy-free cheese alternatives, and nutritional yeast.
- Grainy cheese sauce is often caused by adding cheese to sauce that's too hot or using too high heat.
- To make ahead, prepare mac and cheese, cover tightly, and refrigerate for up to 24 hours before baking; add 5-10 minutes to the baking time if going straight from fridge to oven.
- While nutrient-dense, mac and cheese is calorie-rich; serve alongside vegetables and lean protein for a balanced meal.
- This homemade version offers nutritional advantages over boxed varieties, providing protein, calcium, fiber (with whole wheat pasta), and beneficial vitamins.